But, one change that came when Cataclysm was launched was that it was now a tamable hunter pet!
Chromaggus was the 2nd to last boss of Blackwing Lair (BWL). He was perhaps more challenging than the end boss, Nefarian, due to the debuffs he can cast on players.
As a hunter pet he is beautiful. A core hound, Chromaggus is a unique pet because no other core hound shares his skin.
Chromaggus is also a challenge tame for two reasons: first, being the second to last boss in a raid, you must be in a raid group (all members must be level 60 or higher) and second, you cannot get past the first boss without at least one more player to help you out. Although every other boss in the raid is easily soloed be a level 80 hunter with a good tenacity pet, the first boss is quite a challenge, making this pet rather hard to come by.
Basic Info:
NPC ID: 14020
Type: Core Hound
Skin: Purple with Spikes
Rarity: Rare
Exotic (BM Only)
Challenges:
- Raid Boss: Must be in a raid to access the pet
- Attunement: You must be Attuned to BWL in order to enter the raid. Conversly you can enter BWL though a doorway near the end of Upper Blackrock Spire (UBRS)
- Razorgore the Untamed: This boss is required and cannot be solo'd. Requires at least two (easier with more) 80+ players to help kill this boss
- Chrommagus: All other players must be out of the room when you tame, as I explain later
Guide Part 1: Attunement

You do not need to become attuned to BWL to enter it, you can enter through the backdoor at the end of UBRS which I'll cover a bit later, but Attunement does make things easier if you plan to do Transmog runs, as all of the Tier 2 Dungeon Pieces (with the exception of the pants) drop from bosses in BWL.
Attunement is a fairly simple process. You must find and kill the Scarshield Quartermaster (NPC ID 9046).
Looting him will give you an item "Blackhand's Command" which begins a short quest chain. Complete the quest chain and you can use the Orb of Command to ender BWL at any time. He is located at 47.77, 69.07 in Blackrock Mountain. Face outward from the portal for UBRS, turn left into the hallway and take the next left and you should find him. He was previously marked as a rare NPC but is not flagged as a quest NPC and his spawn time is greatly increased, he spawns after a few minutes now. Quite simple to attune.

 |
| Don't mind him, he loves the countless deaths just to spawn a minute later to await another cruel death. Like Kenny. |

Guide Part 2: Entrance (Without Attunement)
If you're not attuned and can't find the NPC, simply enter the portal for UBRS. Kill all the mobs in the first room then take the first left into the upper area. This area has several rooms which must be cleared completely for the upper door to open.

Once the door is opened you'll have to face the first boss in UBRS, the Pyroguard Emberseer. The room you've just entered has several mobs channeling at a fire elemental. On the room there is a pedestal which you can click. Clicking once will stop the channeling allowing you to kill all the mobs. Clicking a second time will allow you to channel, which sets of a long timer allowing the Emberseer to grow in size. Once he's fully formed, kill him and the door to the next room opens.
This is the Rookery, where you can kill 50 Rookery Whelps in less than 15 seconds for the Leeeerroyyy Achievement, if you wish. Find the partially collapsed ramp leading up, and fight though mobs into a large hallway. At the end of this hallway you'll find a large room down below, which is the Stadium. Jumping down will begin the event which culminates in you killing Warchief Rend Blackhand and Gyth, the most beautiful purple drake in the game. Sadly there is no mount that corresponds to this skin...
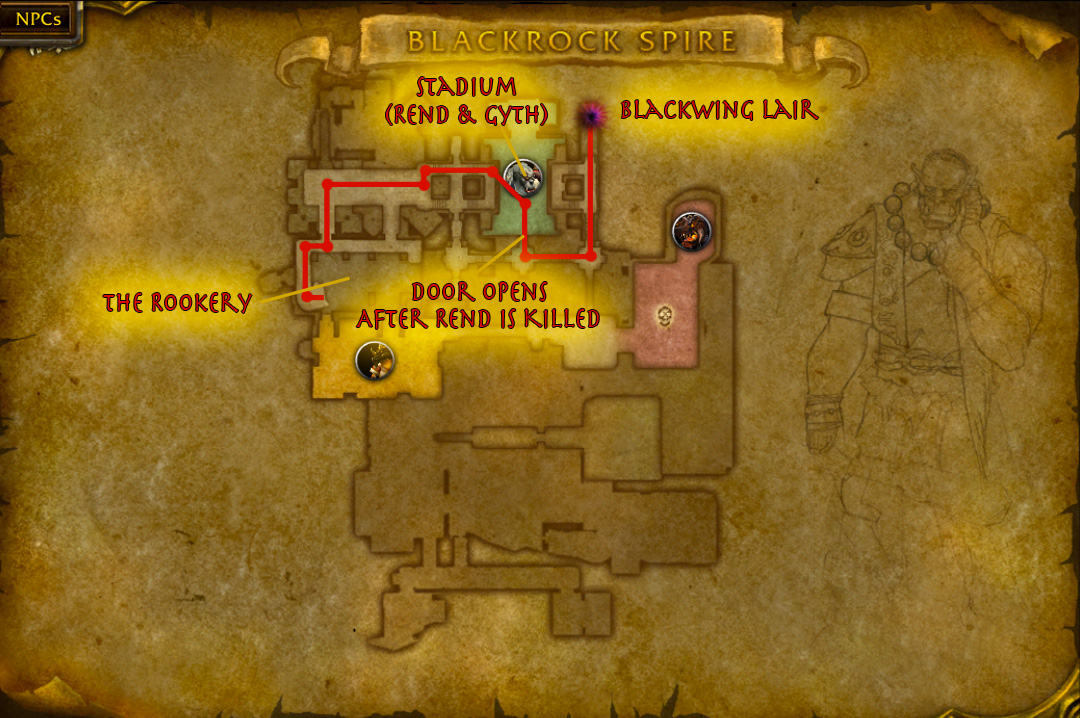
Once this is completed the doors will open up again. Exit the small doorway and turn left. Follow the hallway all the way down and take another left into the portal for BWL.
Guide Part 3: Razorgore the Untamed
 |
| He or she or... whatever... doesn't like it when you touch those eggs. |
This is the part where you need at least 1 other Raid Member. Razorgore is in a room surrounded by drake eggs. Killing Razorgore causes all of the eggs to explode, causing instant death to everyone in the room and does not open the door out of this room. In addition, the eggs cannot be destroyed by any player ability. So how does one leave this room?
There is another Orb of Command on the pedestal to your left as you enter the room. Clicking this orb will give you control of Razorgore. He has several abilities, the most important one is called "Destroy Egg". While controlling Razorgore you must destroy all of the eggs in the room. However, hostile mobs will spawn which attack Razorgore unless taunted/kited away.
This is where the strategy comes in. One player must control Razorgore while another player kites the mobs off of him. However, you only gain control of Razorgore for a limited time, not enough time to kill all the eggs. If you're really on your game it will take you three controls to kill all the eggs, probably closer to 4. And, to make this more challenging, once a player has controlled Razorgore a debuff is applied making it impossible to control him again for a limited time, so each player must take turns.
I recommend at least 3 players to allow two to kite and one to control Razorgore. One important thing to note is that you cannot have any summoned pets while controlling Razorgore - if you attempt to do so and have a pet active the channel will fail but you'll still get the debuff! So put those pets away for this fight if you plan on controlling him.

Guide Part 4: Getting there
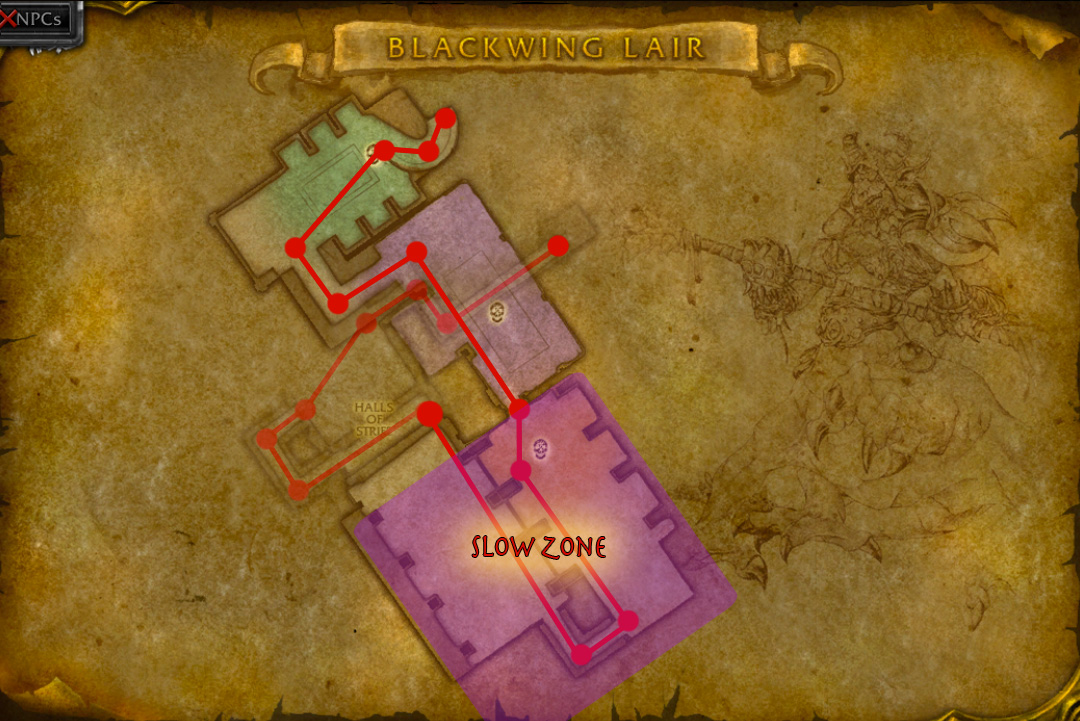
Once Razorgore is downed the rest of the raid is quite simple. Some of the bosses can be skipped but you should down them anyway, they drop some great transmog items and can easily be soloed at level 80, let alone 90. The only challenging bit after this is the Crimson Laboratories area. This area gives all players a movement debuff which is a crawl. Disengage does work, however, so I recommend turning around and hitting Disengage to speed up the process. You'll have to make your way past hordes of whelps, killing many while you inch your way up to the boss, Broodlord Lashlayer. Once he's killed the doors open and you can leave this area, returning to normal run speed.
Guide Part 5: Chromaggus at last!
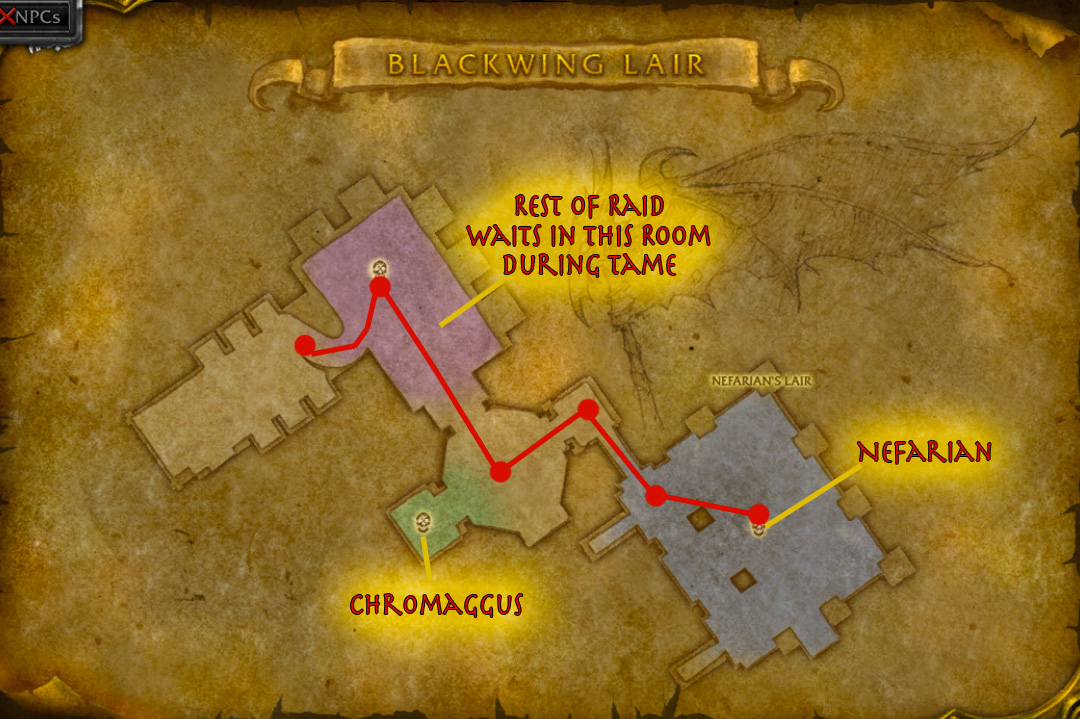
Chromaggus is the 2nd to last boss in the raid. He is located in a gated-off room and must be killed or tamed in order to face Nefarian. If you're looking at taming this boss it is important to keep two things in mind. First, the rest of your group must stay outside of his room. Keep them in the hallway just outside of this separate room. I'll explain why in the next paragraph.
Second, Chromaggus has several abilities that can make taming challenging (although on my tame this was not a problem). Chromaggus will cas afflictions on players, one for each of the dragonflights. The afflictions are:
Brood Affliction: Red: Disease. 50 Fire damage every three seconds. Heals Chromaggus on death.
Brood Affliction: Green: Poison. Healing reduced by 50%, 250 Nature damage every 5 seconds.
Brood Affliction: Blue: Magic. Movement slowed by 70%. Casting speed reduced by 50%. 50 mana and 1 health drained per second.
Brood Affliction: Black: Curse. Fire Damage increased by 100%.
Brood Affliction: Bronze: 4 second stun at random intervals for 10 minutes. Can only be removed with Hourglass Sand.
The Red, Green or Bronze afflictions are quite serious as they might interrupt your tame. Use the deterrence macro for safety, and if you have another core-hound go ahead and pop ancient hysteria just to be safe. I actually did neither of these and was fine but better to be safe than sorry.
Chromaggus will cast these randomly on players which will halt your tame (as he's no longer tagged by your tame) so the rest of the group must be out of his room. If a player has all five afflictions they will undergo a "Chromatic Mutation" which puts the player under Chromaggus' control. The player does serious damage in this form and will 2 or 3 shot a fellow player.
Once Chromaggus is tamed the door to Nefarian opens, allowing the rest of the players to complete the raid. Chromaggus also drops the Tier 2 Shoulders which are something I'm currently farming, so be advised that others in your group may want to down him.
Conversely you can always have someone join your raid then log off allowing you to solo him.
I hope this guide was helpful. I'll be editing a video together in the next few days as well as uploading screenshots, but I wanted to get this out there as soon as I could.
LINKS:
[img]https://i.imgur.com/hBUlc3l.jpg[/img]
ReplyDeleteBolavita Merupakan Bandar Togel Online Terbesar Dan Memiliki Diskon Angka yang Besar... Bolavita jg menyediakan game online lainnya :
# Sabung Ayam
# Bola
# Casino
# Tangkas
# Tembak Ikan
# Poker
# Play1628 (Slot)
# Wm Casino
Bila Anda Ingin bergabung bersama kami, Dapat hubungi : BBM: Bolavita | WA: 081377055002 | Line: cs_bolavita
Telah hadir di bolavita deposit via pulsa telkomsel
ReplyDeletedan banyak bonus2 mendarik lain nya min depo 25 rbu bisa jadi jutawan
ayo segera daftar dan buktikan sendiri sabung ayam live
info lbh lanjut:
WA: +62812-2222-995